Ansible Vault #
What is Ansible Vault? #
When using playbooks or ad-hoc commands, it is possible that your commands have to include sensitive information like passwords, API keys or other credentials. Ansible Vault is a tool used to encrypt sensitive information. It provides a way to keep these secrets secure and prevent them from being accidentally shared or exposed. The vault uses Advanced Encryption Standard (AES) to encrypt data and can be integrated into ad-hoc commands and playbooks.
Besides encrypting data to use in playbooks or ad-hoc commands, it can also be used to create an encrypted inventory file!
Creating a vault #
Creating a vault is pretty easy!
ansible-vault create <name of your vault>After this, you’ll be asked to enter a password. This password will be used to decrypt the vault when you wish to use the sensitive information.
An example of the content is the following:
api_key: DitIsEenAPIKeyWaarde
secret_password: DitIsEenSuperGeheimWachtwoord
The first part is the name of the variable, the second part is the actual value.
When typing in the ansible-vault, know that it will act as the vi text editor in Linux. To enter data, press ‘i’. To save and exit, press escape, enter ‘:wq’ and press enter.
Editing a vault #
If you wish to add or change data in the vault file, enter the following command:
ansible-vault edit vault-secrets-wikiIntegrating the vault into ad-hoc commands #
To use an Ansible Vault file in an ad-hoc command, you can use the –ask-vault-pass option to prompt for the password. For example, to run a command that uses an encrypted file, you could use the following command:
ansible all -m ping --ask-vault-pass --vault-password-file=.vault_passIn this example, the –ask-vault-pass option prompts for the vault password, and the –vault-password-file option specifies a file containing the password.
Integrating the vault into playbooks #
Example 1 #
- Create a new Ansible Vault file using the ansible-vault create command. For example, ansible-vault create secrets.yml.
- Enter a password for the vault file when prompted. Be sure to remember this password, as it will be required to decrypt the file later.
- Add the sensitive variables you want to protect to the vault file using YAML syntax. For example, if you want to protect a variable named db_password, add the following to the vault file:
db_password: secure_password- Save and close the vault file.
- In your playbook, add a reference to the vault file and the variable you want to use. For example, if you want to use the db_password variable in a task, you can add the following:
- name: Example task
  become: true
  vars_files:
    - secrets.yml
  vars:
    db_password: "{{ db_password }}"
  mysql_user:
    name: db_user
    password: "{{ db_password }}"
In this example, the vars_files option references the secrets.yml vault file, and the vars option creates a new variable named db_password that references the value stored in the vault file.
When running the playbook, Ansible will prompt you to enter the password for the vault file before it can be decrypted and used in the playbook. You can also specify the password using the –ask-vault-pass option when running the playbook to avoid the prompt.
Assuming you created a playbook called ‘playbook.yml’ and the vault is called ‘secrets.yml’, an example to run the playbook would be the following:
ansible-playbook -i inventory.ini playbook.yml --ask-vault-pass --vault-password-file=secrets.ymlExample 2 #
Another example to do this would be the following:
---
- name: Example playbook with lookup
  hosts: all
  become: true
  vars_files:
    - /home/ansible/vault/vault-secrets-wiki
  vars:
    password: "{{ lookup('vault', '~/secrets.yml') }}"

  tasks:
    - name: Configure MySQL user
      mysql_user:
        name: db_user
        password: "{{ password }}"
    - name: Show the password
      debug:
        msg: "Oh no i'm printing the password in plaintext... take a look! {{ password }}"
This example uses the lookup command to search the vault and makes it usable in the ansible tasks.
Ansible Roles #
What are Ansible Roles? #
Roles provide a framework for fully independent, reusable collections of variables, tasks, templates, files, and modules which can be automatically loaded into playbooks.
For example, if you have a common setup routine for web servers, you can create a role called webserver and use it in any playbook that should set up a web server.
Role Directory Structure: An Ansible role has a standard directory structure. Here’s a brief overview:
roles/
    webserver/
        tasks/
            main.yml
        handlers/
            main.yml
        templates/
            nginx.conf.j2
        files/
            sample.html
        vars/
            main.yml
        defaults/
            main.yml
        meta/
main.ymltasks: Contains the main list of tasks to be executed by the role.handlers: Contains handlers, which may be used by this role or even anywhere outside this role.templates: Contains templates that can use variables to generate host-specific files.files: Contains files which can be deployed without modification.vars: Variables associated with this role.defaults: Default lower-priority variables for this role.meta: Metadata for this role.
Creating a Simple Role:
Create a directory structure:
mkdir -p roles/webserver/tasksDefine tasks for the role. Create a roles/webserver/tasks/main.yml:
---
- name: Install Nginx
  apt:
    name: nginx
    state: present
Use the role in a playbook:
---
- hosts: web_servers
  roles:
    - webserver
Advantages of Using Roles:
- Reusability: Roles can be reused in multiple playbooks.
- Organization: By segregating different tasks, handlers, and variables into roles, the playbook becomes more organized.
- Sharing: Ansible roles can be easily shared via Ansible Galaxy, a community hub for sharing Ansible roles.
Tips:
- Role Variables: Place default role-specific variables in the
defaults/main.ymlfile, as they have the lowest precedence. - Role Dependencies: In the
meta/main.ymlfile, you can define any role dependencies to ensure they run before this role.
Example: Using Ansible Vault in the inventory file #
The inventory file can contain very sensitive information. This can contain usernames, links to private keys, sudo passwords,… you name it!
This is information that you wouldn’t want to show in plain text! In this example we’ll secure our inventory file using ansible vault and variables.
Inventory file content #
First, let’s fill up the inventory file:
[TMLab]
kasm ansible_host=172.16.90.10 ansible_become_password="{{ sudo_kasm }}"
librenms ansible_host=172.16.90.80 ansible_become_password="{{ sudo_libre }}"

[TMLab:vars]
ansible_user=davy.cavens
ansible_ssh_private_key_file=~/.ssh/id_rsa
As you can see, we have defined 2 variables called sudo_kasm and sudo_libre. These contain the sudo passwords for the ‘kasm’ and ’librenms’ host respectively.
Now we’ve refered to certain variables in our inventory file… but we haven’t set any values for the vaults yet!
The directory structure #
To do this, we first have to create a directory structure:
inventory/
├── hosts               # This is our inventory file
├── group_vars/
│   ├── my_group/
│   │   └── vault.yml   # This contains encrypted passwords for a specific group in our inventory file
└── host_vars/
    └── my_host.yml     # This can contain encrypted passwords for a specific host in our inventory files
We’ll be using group_vars in our example.
As we’ve configured the group TMLab in our inventory file, the structure will look like the following:
inventory/
├── hosts               # This is our inventory file
├── group_vars/
│   ├── TMLab/
│   │   └── secrets.yml   # This contains encrypted passwords for a specific group in our inventory file
Creating the vault #
For this, we will create a vault for the group called TMLab. We’ll create a vault called secrets.yml.
To create the vault, navigate to the TMLab folder.
In this folder, enter the following command
ansible-vault create secrets.ymlYou’ll be asked to set a password for the vault.
DO NOT FORGET THE PASSWORD TO THIS VAULT!
This will open a vi-like shell where you can enter your passwords. Remember what we entered in our inventory file? We referenced 2 specific variables: sudo_kasm and sudo_libre. These variables will need to exist in our vault file:
sudo_kasm: Your-kasm-password
sudo_libre: Your-libre-password
Using the vault #
We’ll do an ad-hoc command “ping”.
To reference both our inventory file and ask for a password, we’ll have to use the following command:
Note: this command assumes you are in the same directory as your inventory file. If this is not the case, also enter the path to your inventory file.
ansible TMLab -i inventory --ask-vault-password -m pingAfter this, you’ll be asked to enter the vault password. As we are connecting to the TMLab group as our target, ansible knows that it needs to use the secrets.yml file in the group_vars/TMLab directory.
68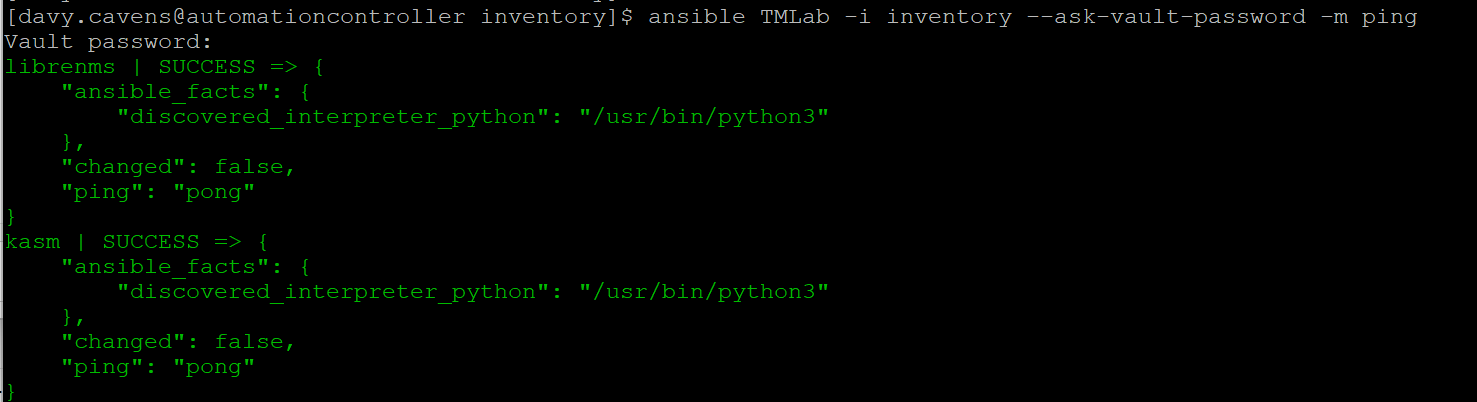
Using it in a playbook #
Say we have a playbook to update all CentOS hosts called “update_os.yml”:
---
- name: Update packages
  hosts: all
  become: yes

  tasks:
  - name: Update packages
    yum:
      name: '*'
      state: latest
      update_cache: yes
      update_only: yes
    when: ansible_distribution == 'CentOS'

  - name: Update Kernel specifically
    yum:
      name: 'kernel'
      state: latest
    when: ansible_distribution == 'CentOS'

  - name: Clean packages that arent needed
    yum:
      autoremove: yes
    when: ansible_distribution == 'CentOS'
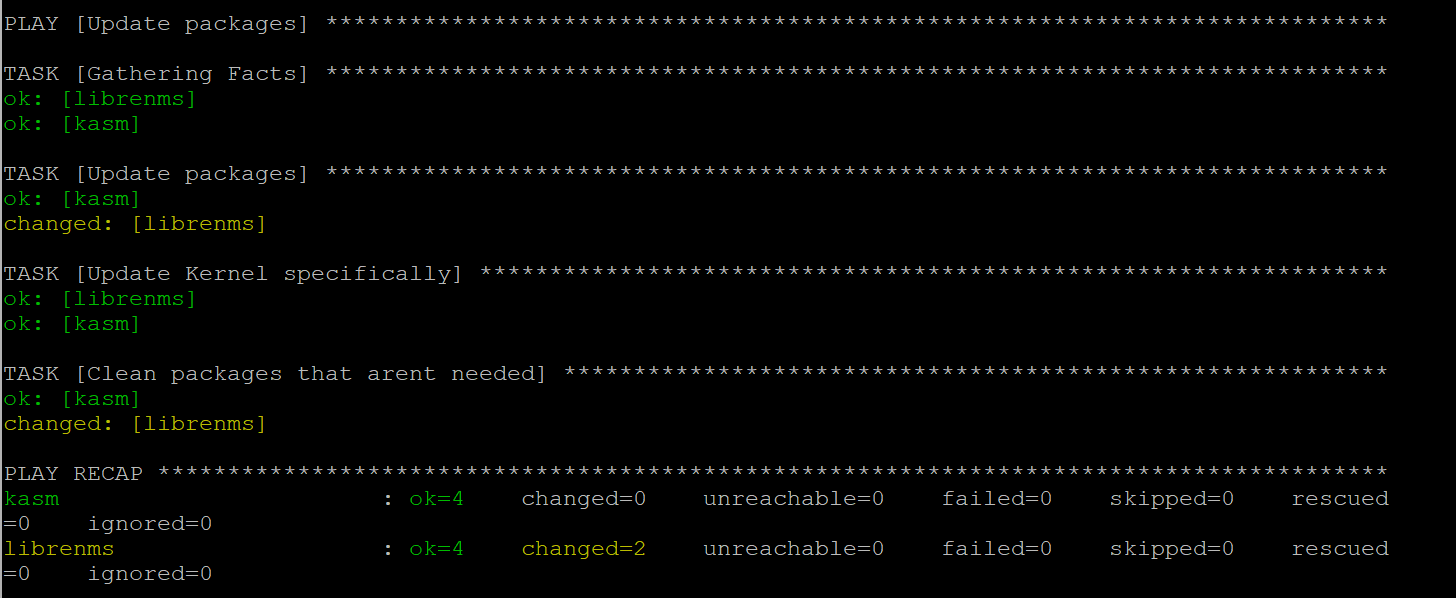
To use the same vault as we referenced earlier, we can use the following command:
ansible-playbook update_os.yml --ask-vault-pass -i /ansible/inventory/hostsAs earlier, a vault pass will be asked and if the hosts in the TMLab group are CentOS hosts, they will be updated:
Multiple vaults in one inventory file #
When you have multiple groups, each with a specific vault, running a playbook with the previous command will return an error.
You can reference a specific group in your ansible-playbook command. This example references specifically the group TMLab from our inventory file and uses only the vault pass for this group:
ansible-playbook update_os.yml -i hosts -l TMLab --ask-vault-passwordExample: Using Ansible Roles #
To make the concept of roles more clear, let’s go through an example.
Our usecase for this example will be deploying an apache webserver.
Directory structure #
webserver-setup/
│
├── site.yml
│
└── roles/
    └── apache/
        ├── tasks/
        │   └── main.yml
        ├── handlers/
        │   └── main.yml
        ├── templates/
        │   └── apache.conf.j2
        └── vars/
            └── main.yml
In this directory structure, you can see we have a directory called ‘roles’. The subdirectory is called ‘apache’, that will be the name of our self-defined role. The real magic happens in the subdirectories of the Apache role!
Let’s go through the components one by one.
The main playbook #
The main playbook (outside the roles directory) is called ‘site.yml’. We will reference our created role here.
The playbook could look as follows:
---
- name: Deploy Apache Webserver
  hosts: webservers
  become: yes
  roles:
    - apache
As you can see, our playbook has a parameter called “roles”. This one references our apache role.
Inside the Apache role #
Tasks #
Within tasks, we’ve defined a main.yml task file. In this we can put all our tasks that we want to execute on the target. It could look like the example below:
---
- name: Ensure Apache is installed
  apt:
    name: apache2
    state: present

- name: Ensure Apache configuration is in place
  template:
    src: apache.conf.j2
    dest: /etc/apache2/sites-available/default.conf
  notify: restart apache
As you can see, the task “ensure Apache configuration is in place” references a template. It will look in the ’templates’ directory for a file we reference here.
Templates #
Templates are configuration templates which can be populated with variables. Here’s an example of our apache.conf.j2 file:
<VirtualHost *:80>
    DocumentRoot "{{ document_root }}"
    ...
</VirtualHost>
Handlers #
Handlers are tasks in a playbook that run only once and are triggered by statements in other tasks. This is done specifically with the notify statement.
This task restarts the apache service:
---
- name: restart apache
  service:
    name: apache2
    state: restarted
Variables #
In our template, we referenced a variable. This also needs to be defined in a file within the ‘vars’ directory:
---
document_root: /var/www/html
Running the playbook #
We assume that we have an inventory file with a host group called ‘webservers’, as this is defined in our main playbook.
To run the playbook and the defined role, simply enter the following:
ansible-playbook site.yml                         # if using the default inventory file
ansible-playbook -i path_to_inventory site.yml    # If using a non-default inventory file
Ansible and GIT #
All our Ansible files have been hosted on the Ansible Controller itself. This may not cause any immediate issues, but what would happen if our Ansible Controller crashed and the files cannot be retrieved? We would lose all our files, which might be disastrous!
We can link our ansible files to a remote git repository, like GitHub. If our Ansible controller would crash, we would still have all our files available to us on GitHub. After setting up a new host, we can just pull the repository data to our new controller.
In this topic, we’ll learn how to link Ansible to Git.
Creating a repository #
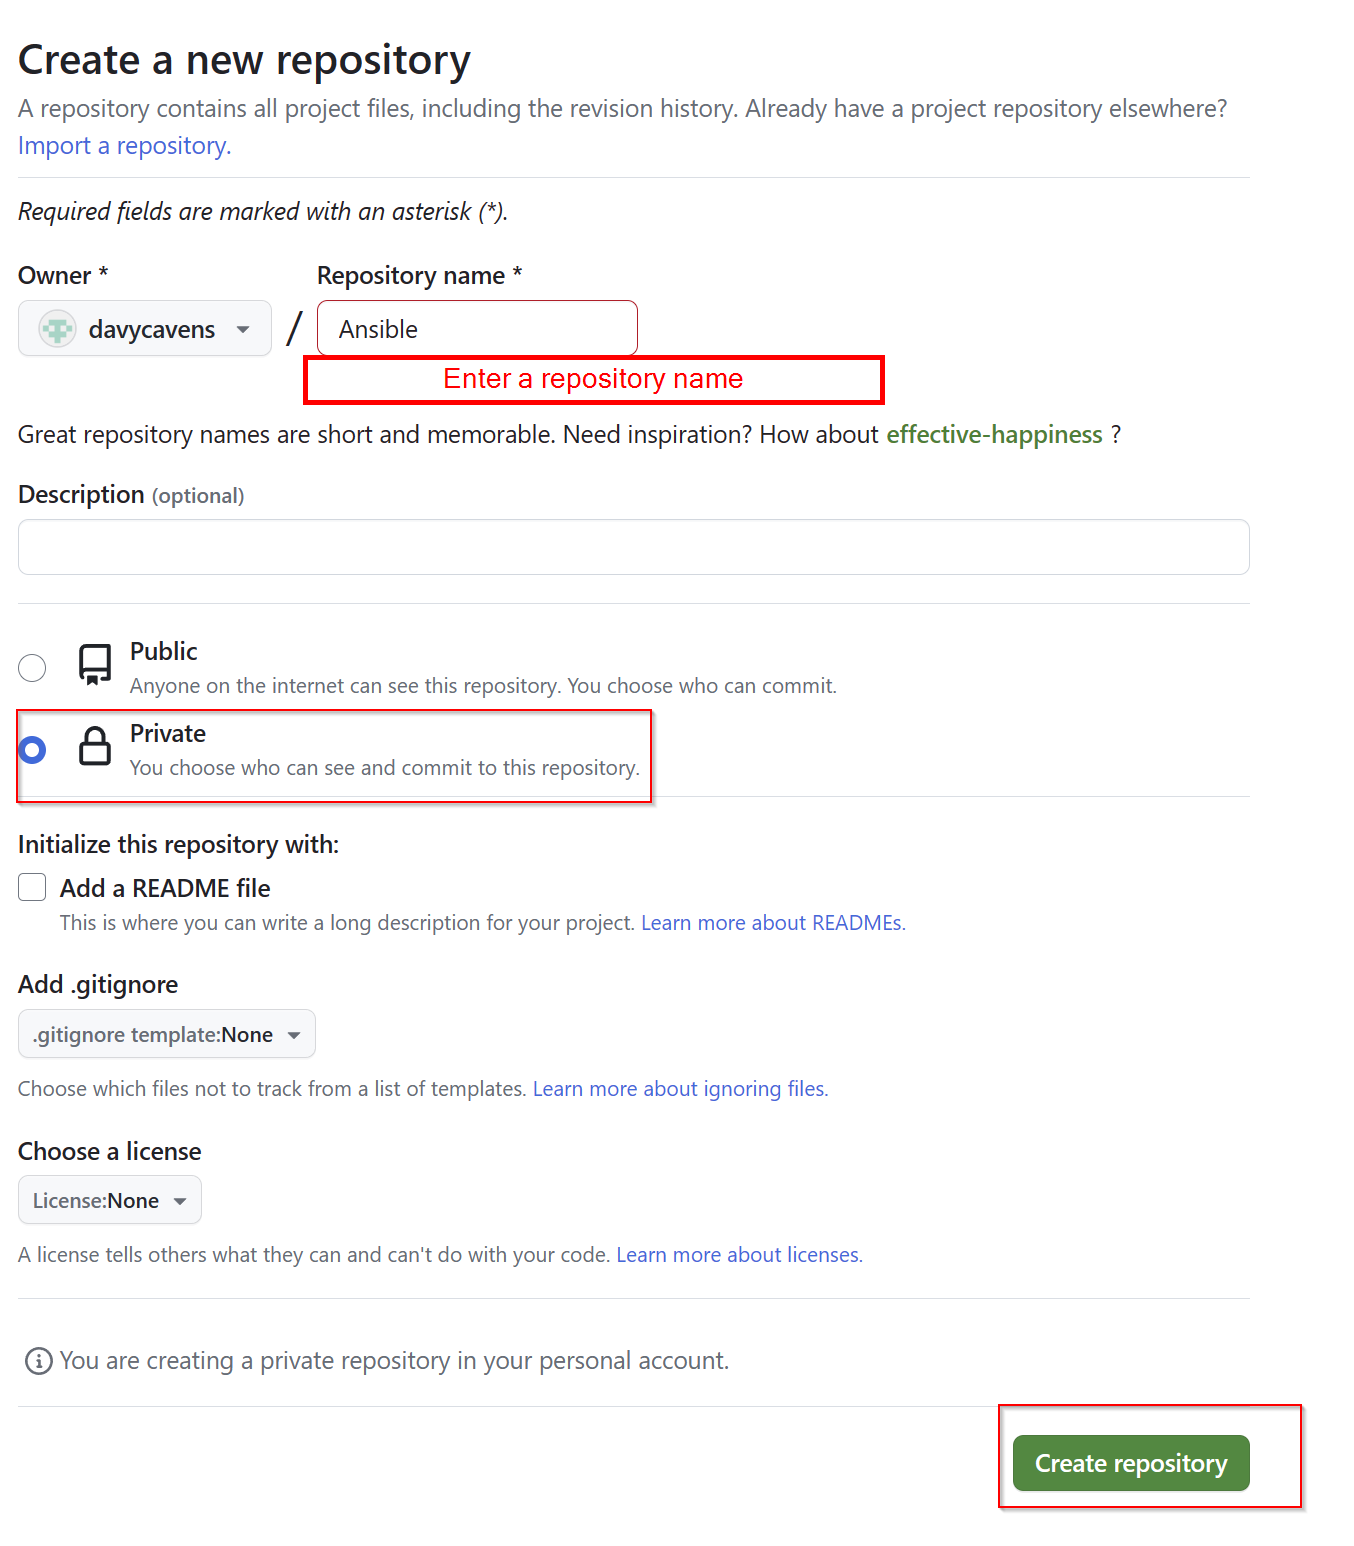
- Navigate to GitHub.com and create a repository

- Make a private repository called “Ansible” (or any other name you’d prefer)
Linking an SSH key #
- Optional step, if you have not yet created an SSH key, you can generate a key using the
ssh-keygencommand. - If you already have a key (usually found stored as ~/.ssh/id_rsa.pub), show the public key’s content and copy it. Show the key using the following command
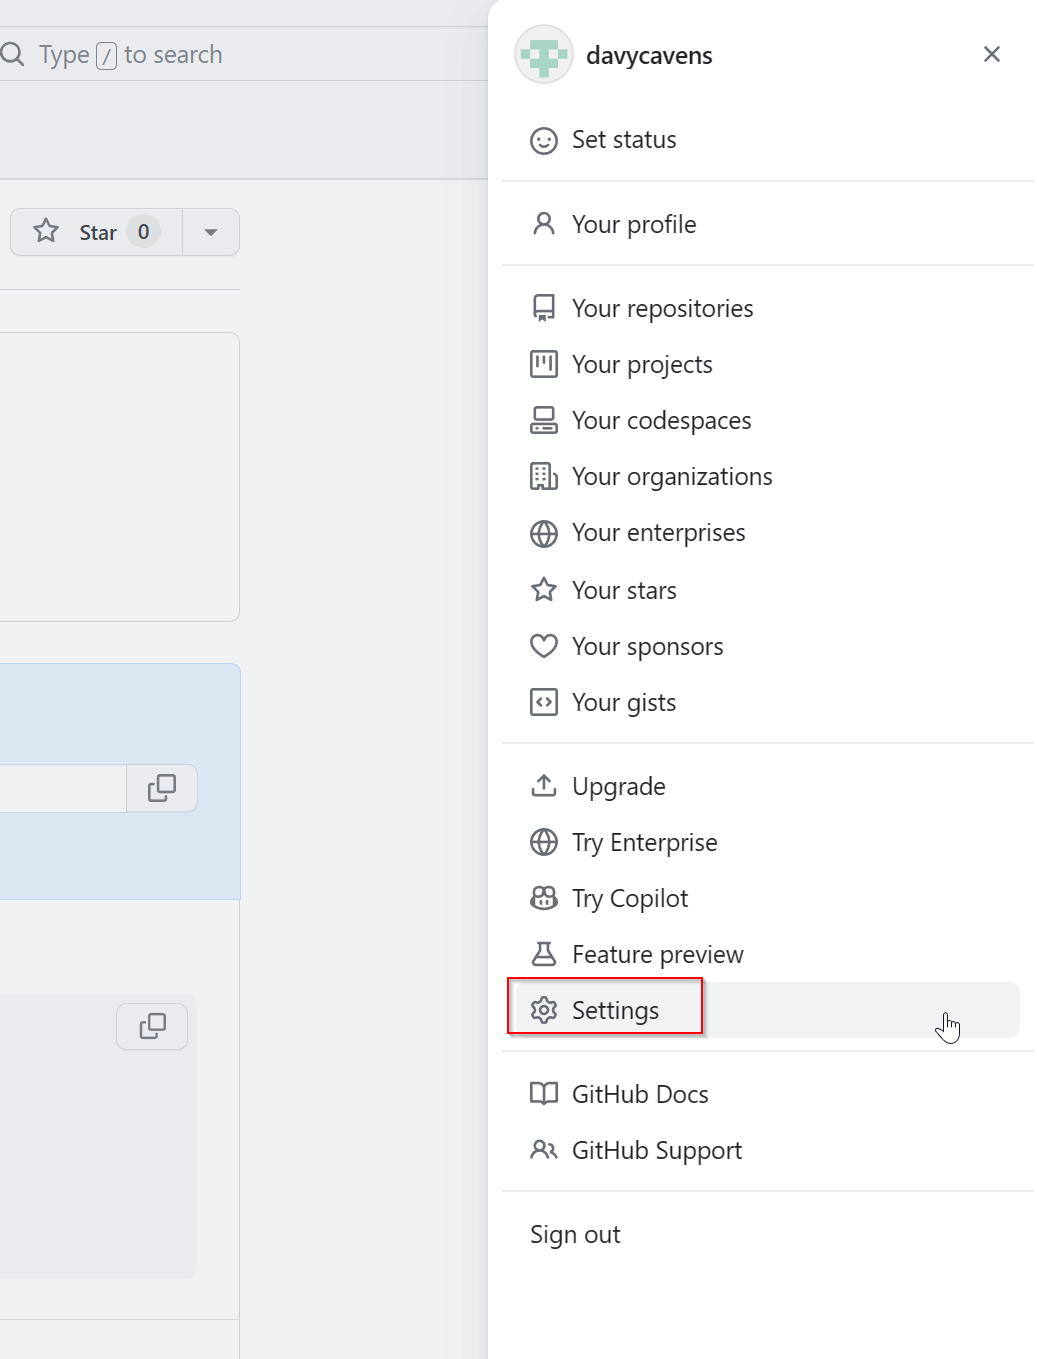
cat ~/.ssh/id_rsa.pub - Next, link the key to GitHub. Navigate to settings (click your user on the top right in GitHub):
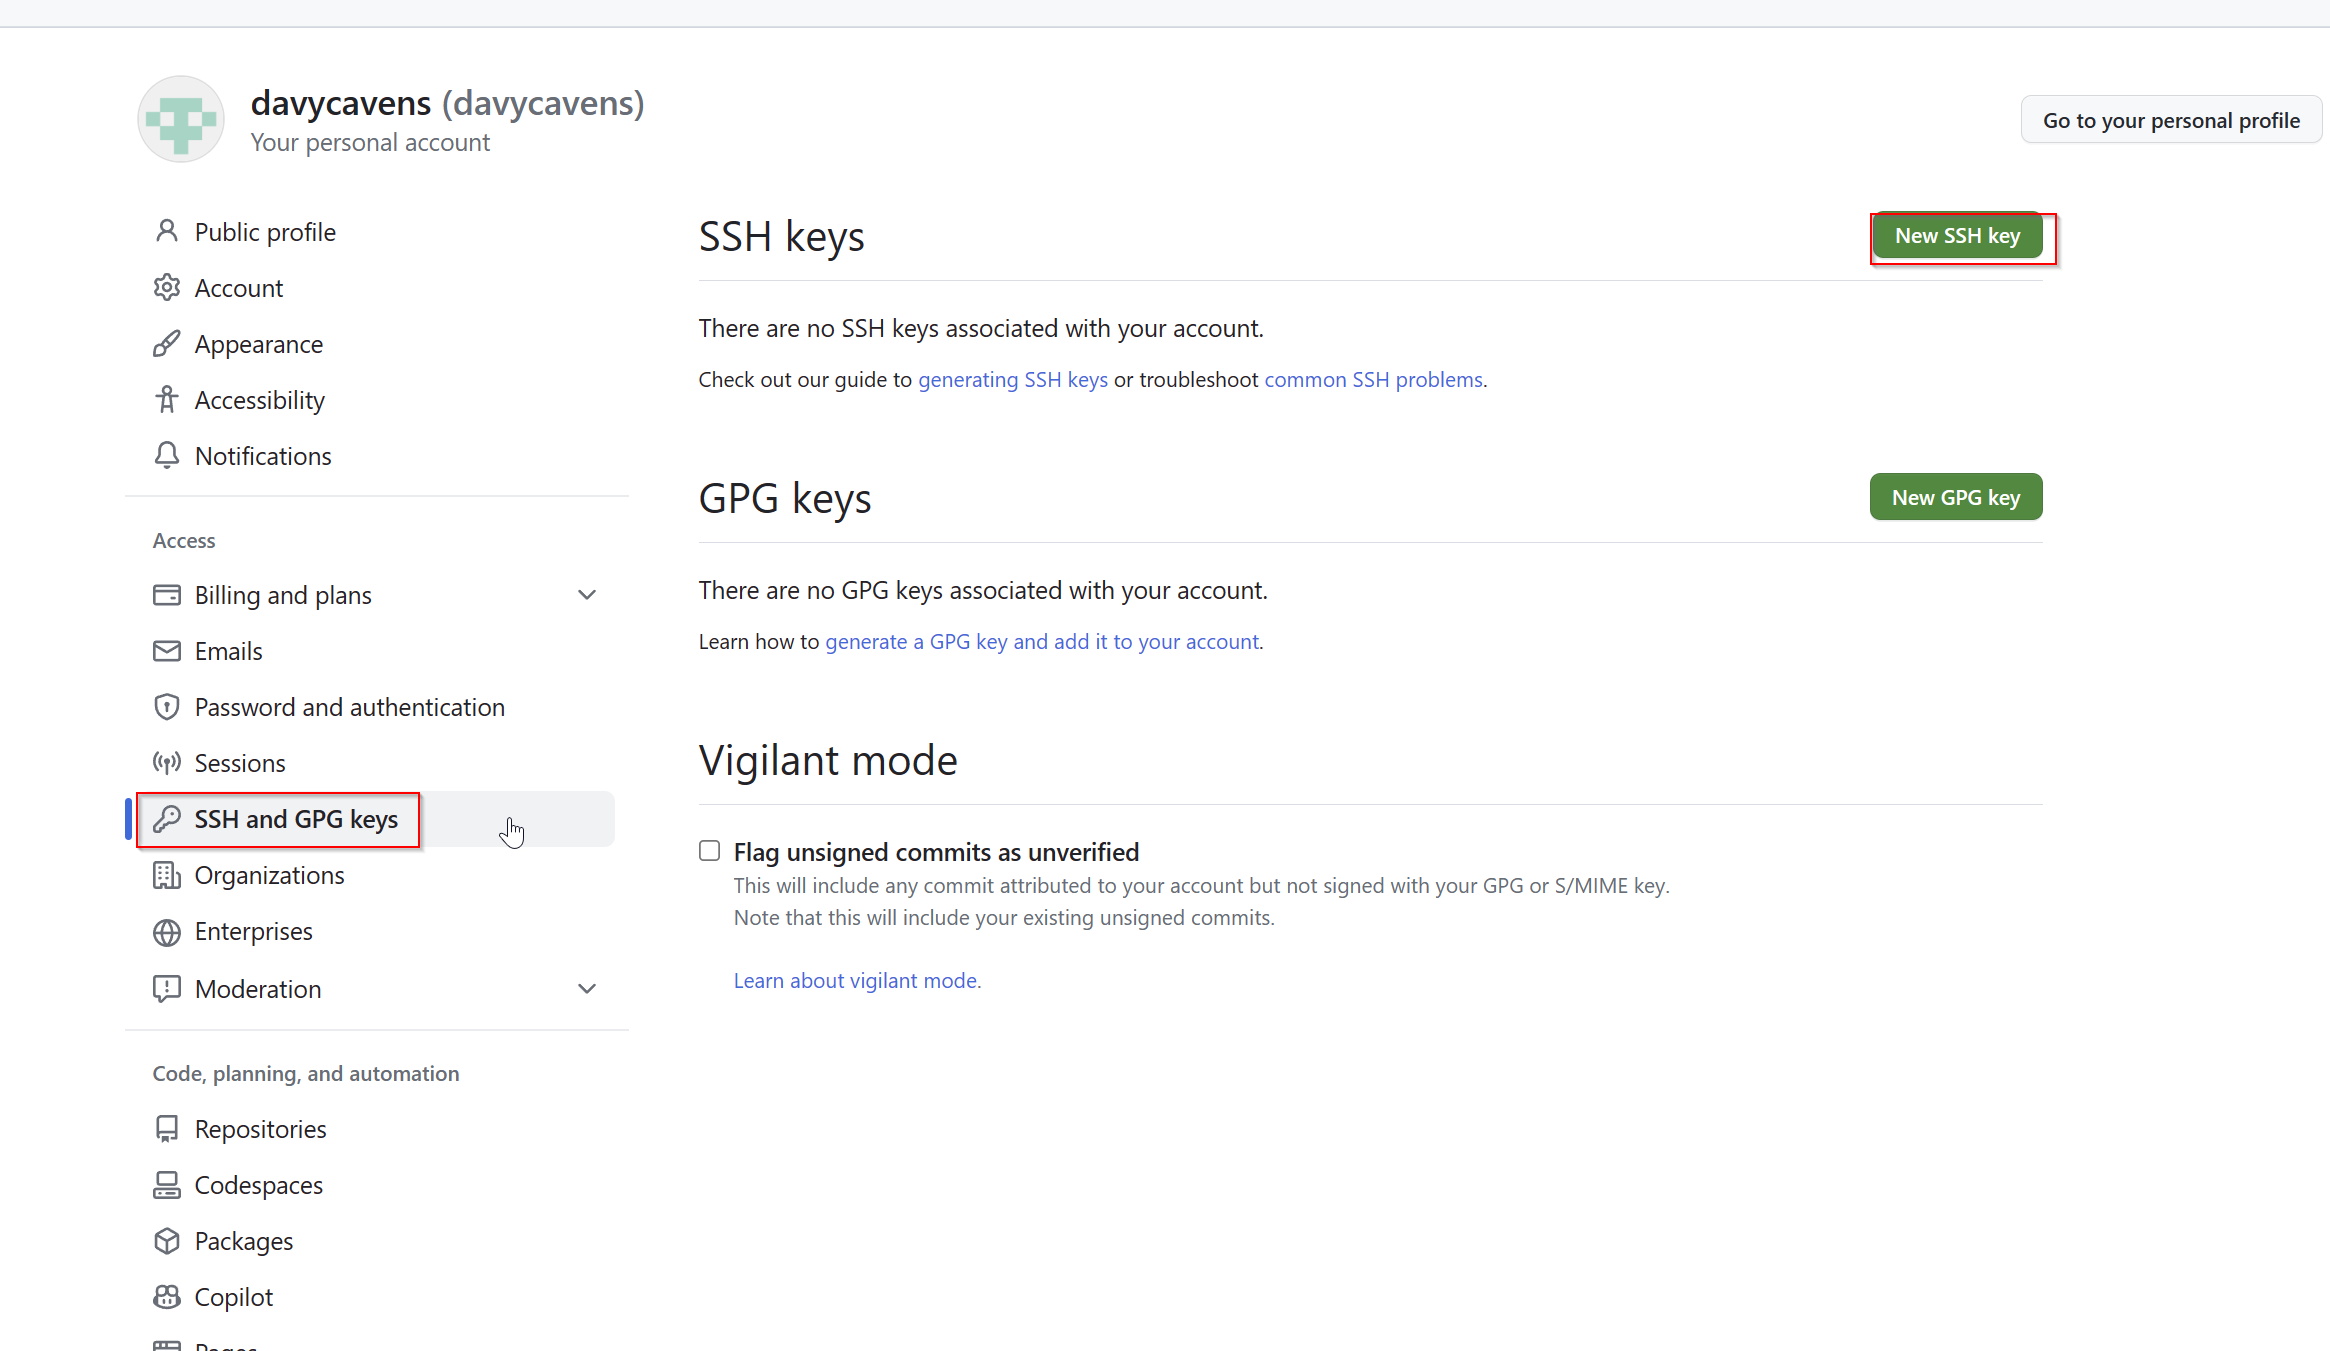
- Next, navigate to “SSH and GPG Keys” and add a new SSH key
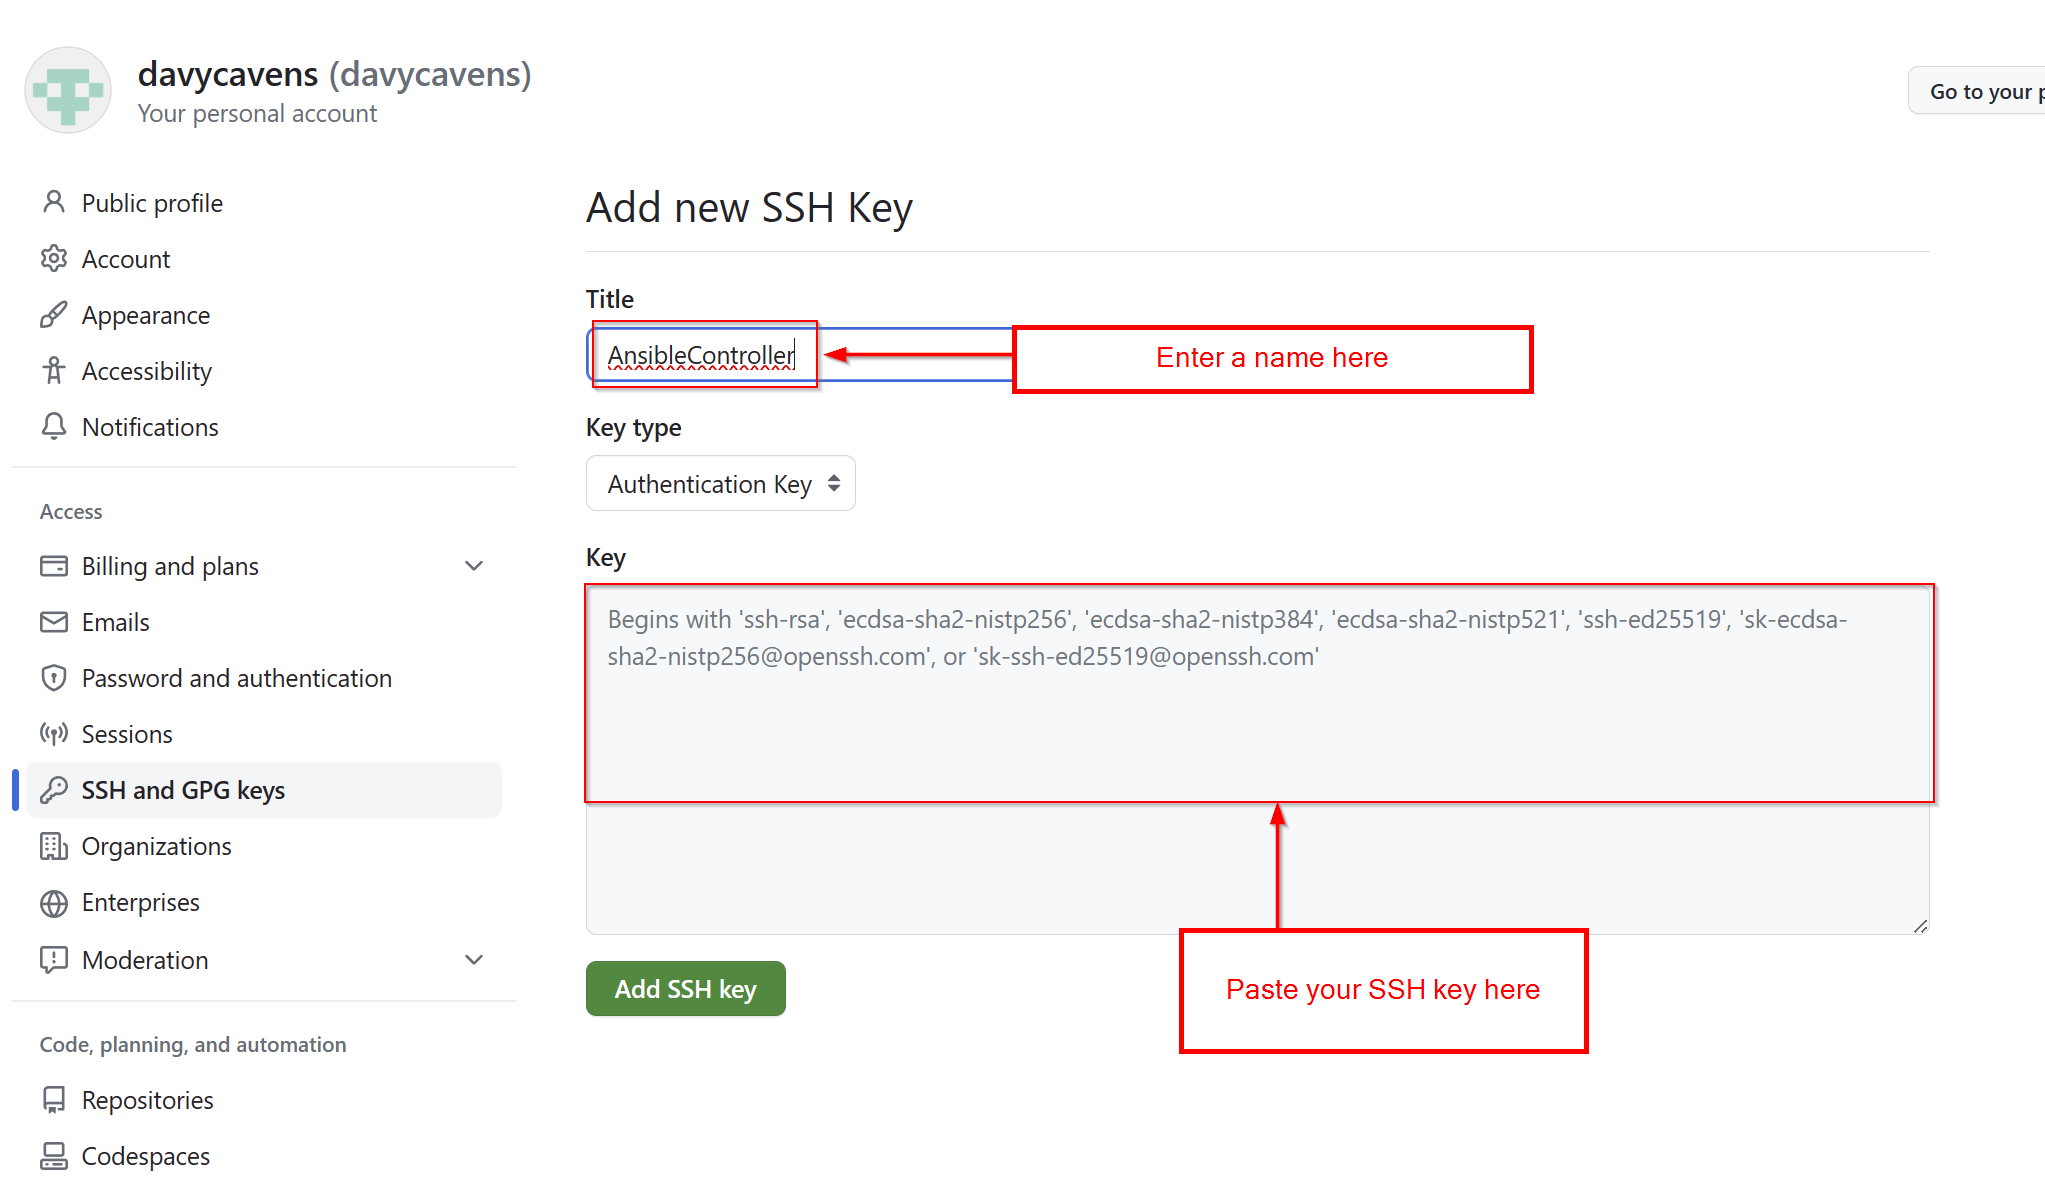
- Enter the SSH key we copied earlier
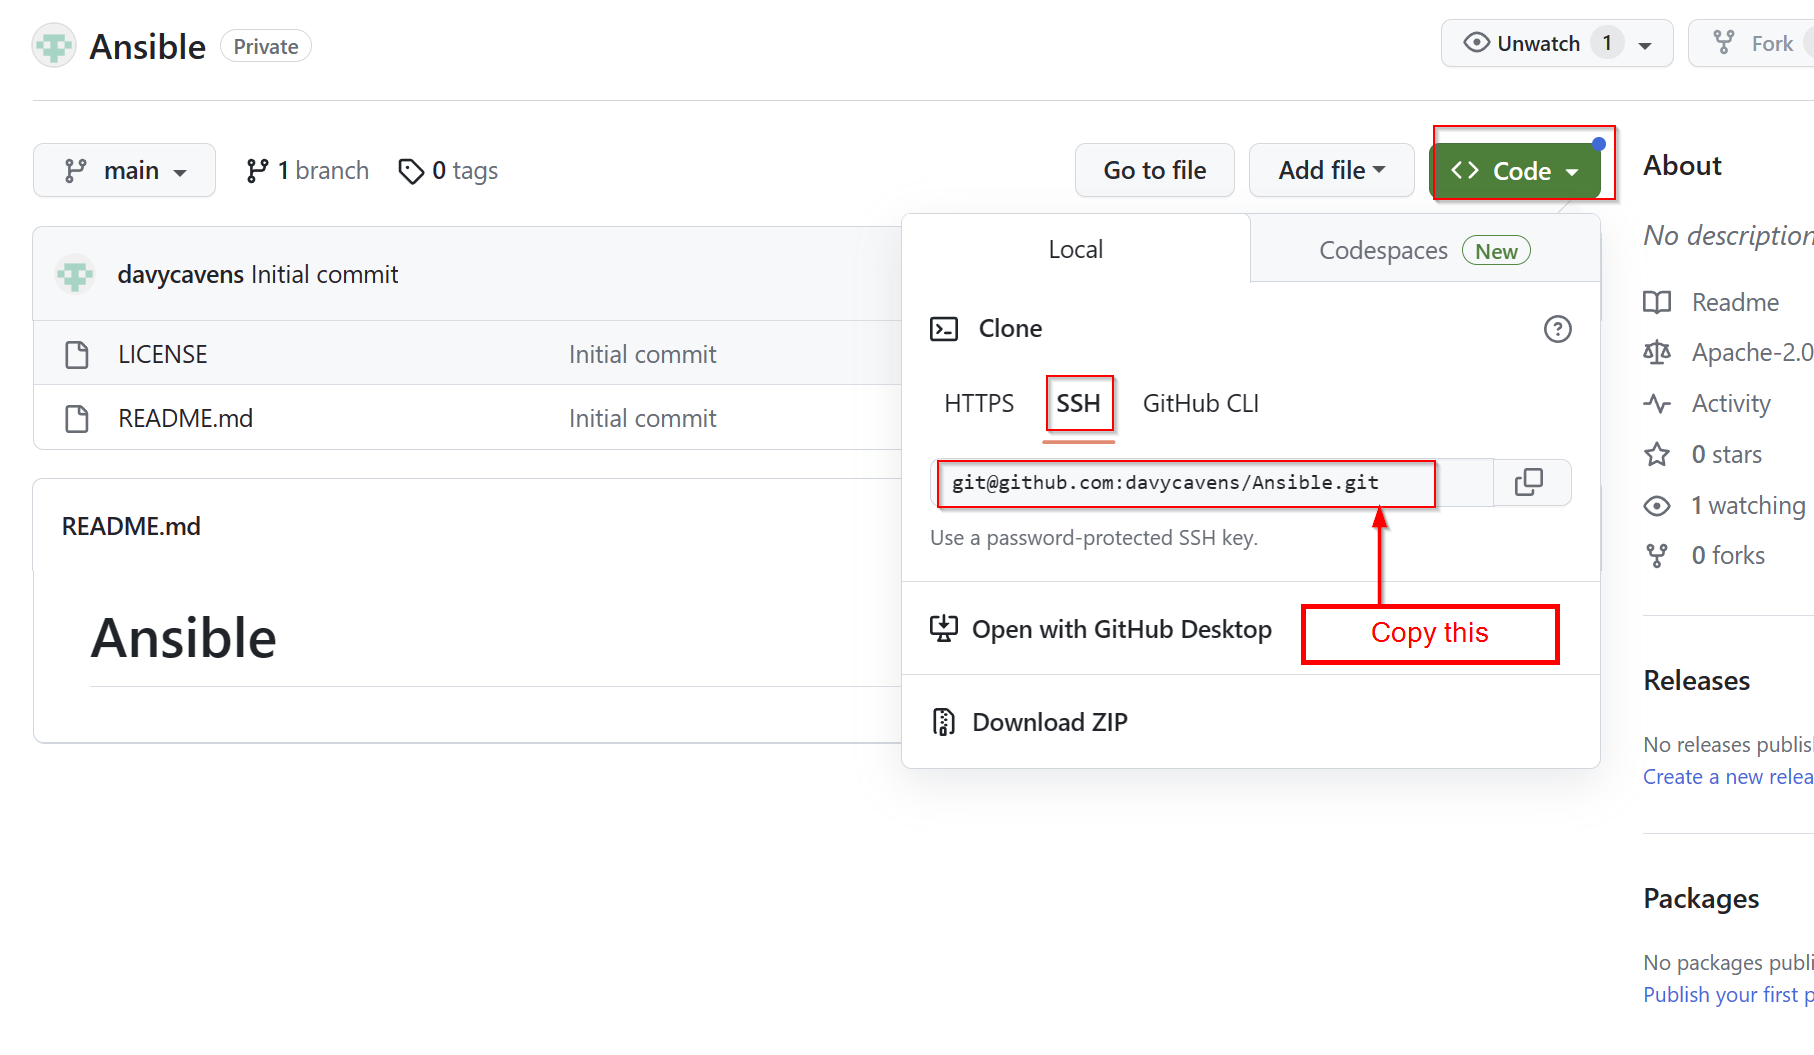
- Copy the git URL for later use:
Initialize git locally #
Now, we can initialize git locally on our Ansible controller.
-
First, enter some global information (if you haven’t yet)
git config --global user.email "an-email@address"
git config --global user.name "your name"
-
Initialize your git repo
git init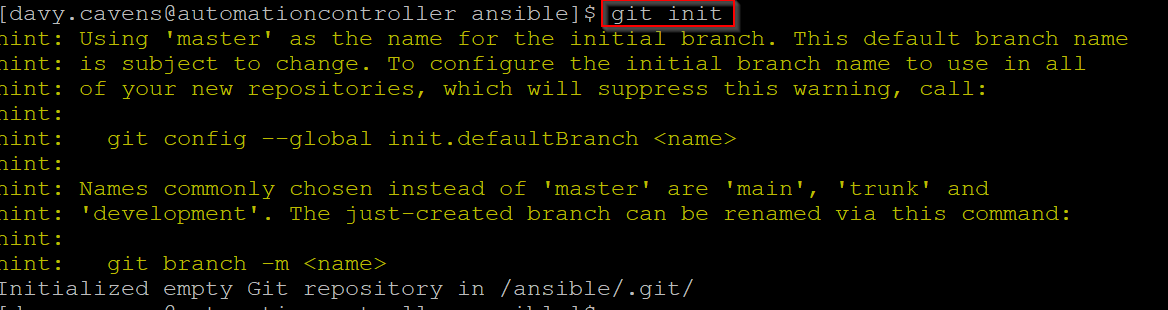
-
Now, add a git ignore file. I
nano .gitignore -
Add the following content to the gitignore file. In this example, we will exclude all files that contain the word secret. (An example would be Ansible vaults).
# .gitignore
*secret*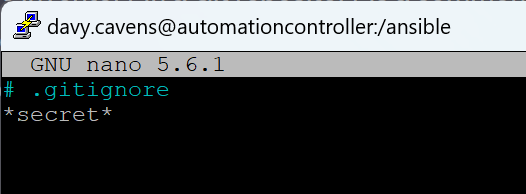
-
Add all files and subdirectories (This assumes your in the top level directory of your ansible folder)
git add * -
Let’s do a first commit now:
git commit -m "Initial commit of Ansible inventory."
-
Now, let’s add a remote repo. We will have to use the git link we copied from GitHub earlier!
git remote add origin git@YOUR-REPOSITORY
-
Now, let’s push it to our remote repo
git push -u origin master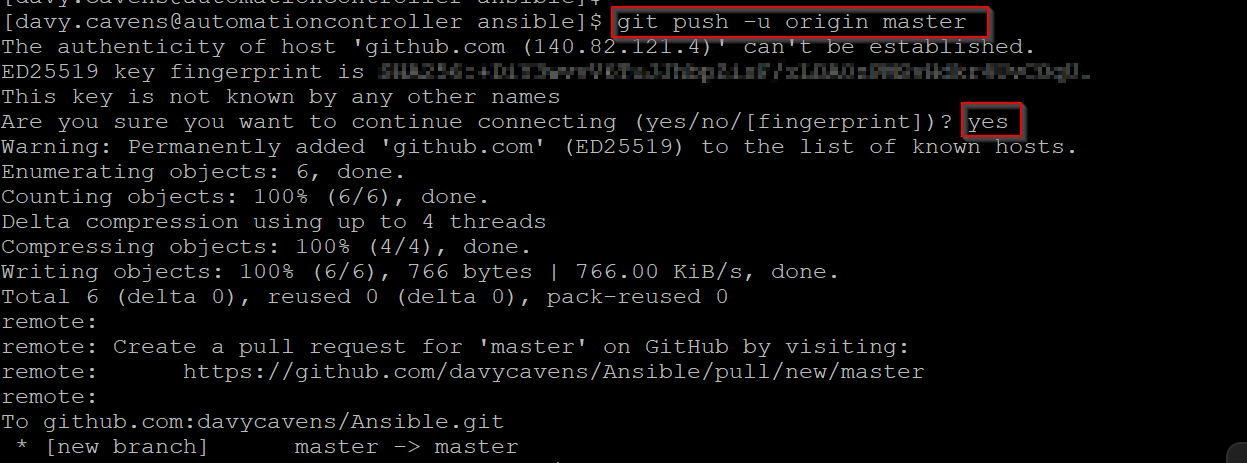
-
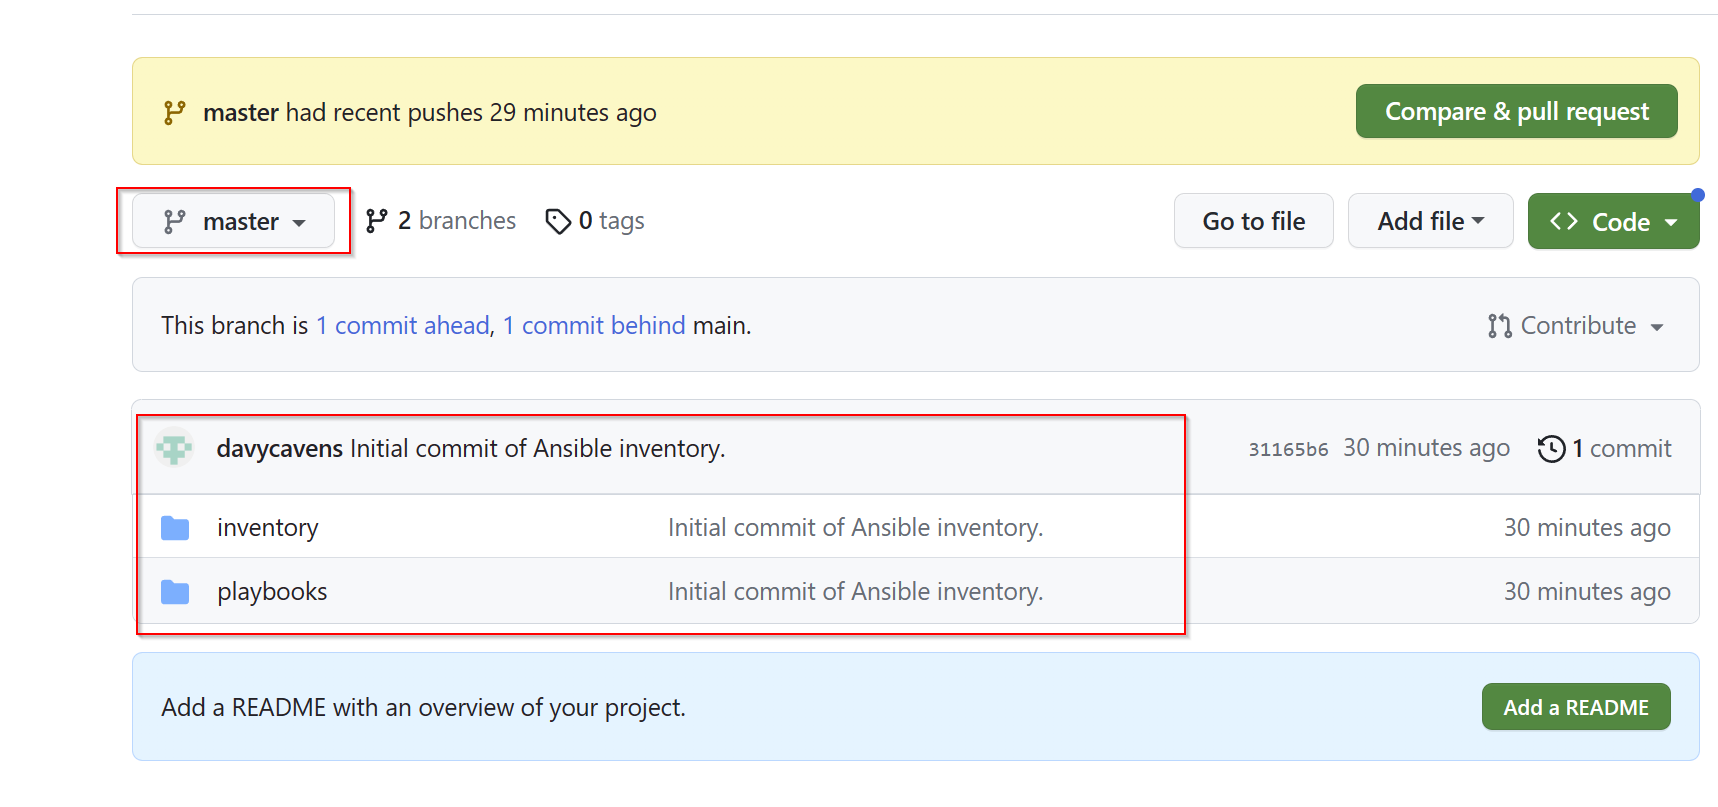
Great! Now verify on your Master branch on github if it uploaded correctly: